
Update as of October 2018: Last years preservation is finally in resin!
Update as of October 2017:
I’ve begun another trial of preservation methods. Find the post here!
Update as of April 2017:
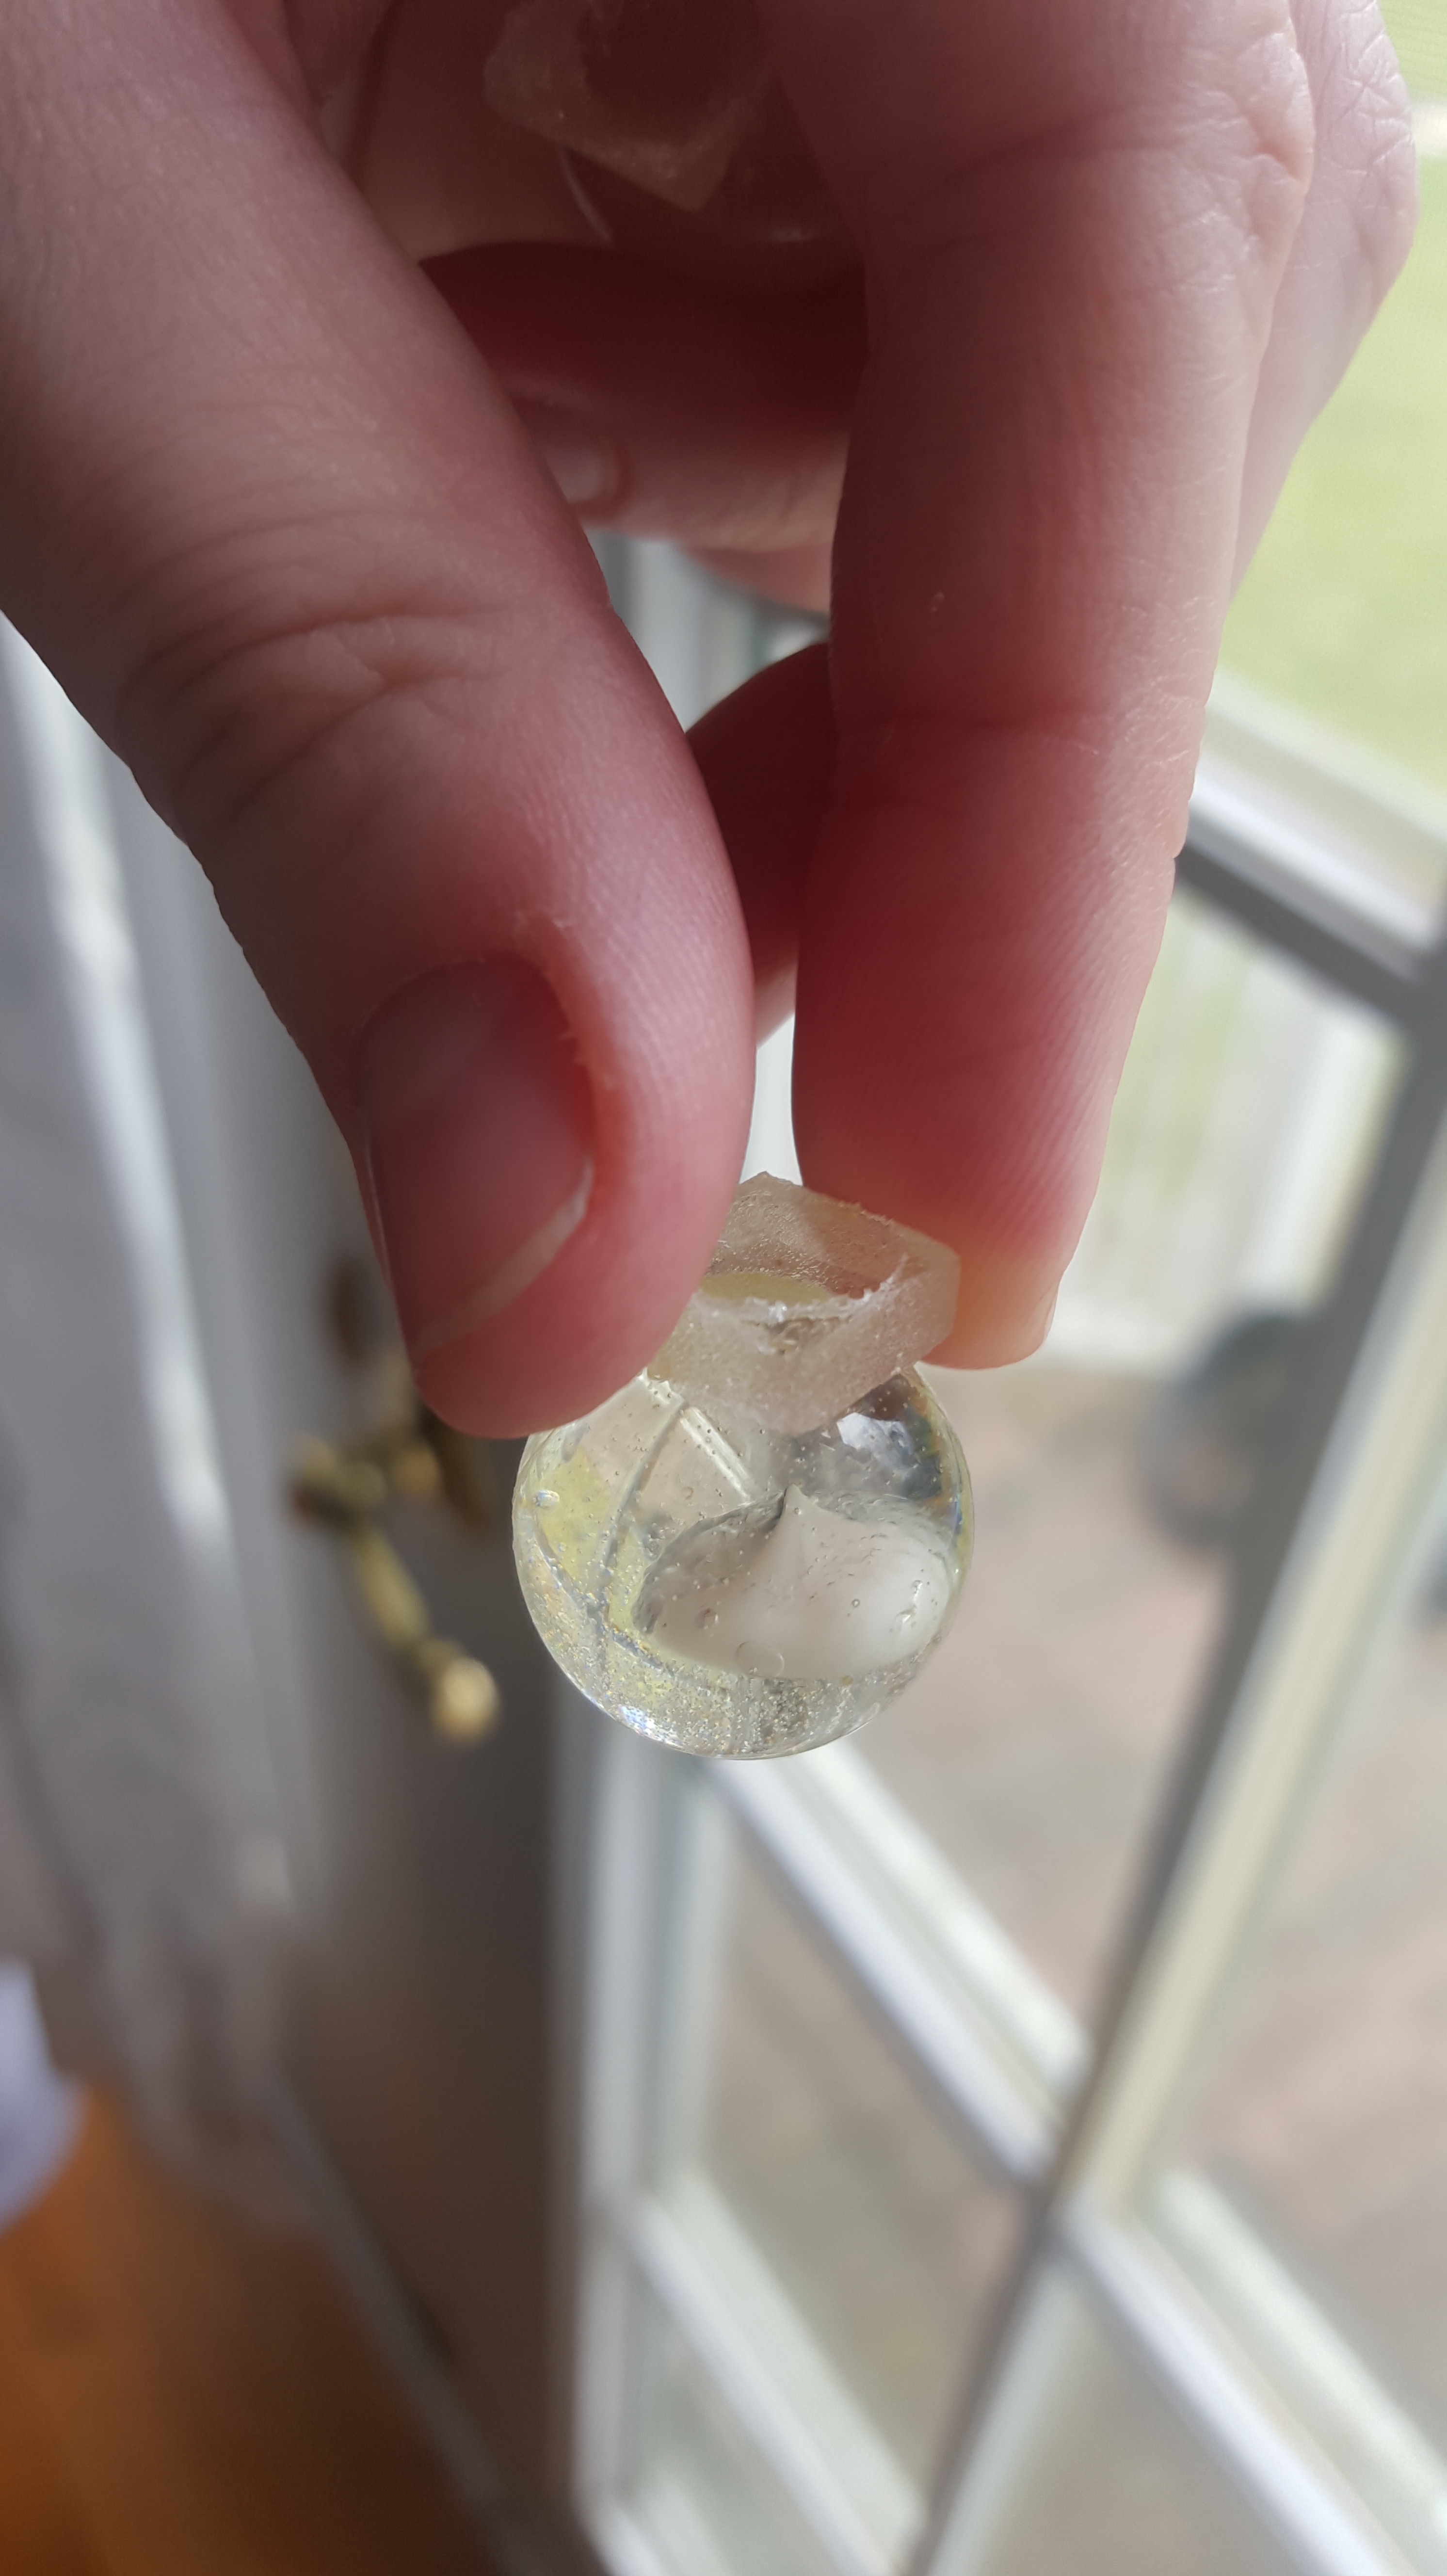
I haven’t tried any more experimentation with milk jewelry. The first picture you will see on this page is an accurate representation of the milk bead I created in resin years ago! It may be slightly more yellow due to the yellowing of the poor quality resin, other than that it looks fabulous.
Update as of March 2016:
The two experiments that have stood the test of nearly a year are the homemade plasticising of the milk and the dehydrated flake method.
1. Homemade Milk Plastic: If you go with this method, it is IMPERATIVE that you completely and absolutely seal the milk-plastic in airproof resin casing. I created a bead using this method and the bead was the only thing to last. All my other efforts where I left the plastic to the air or did not completely encase the plastic failed. They yellowed and discolored. I’m pretty amazed that nearly a year later, the milk-plastic bead is still its original color and looks amazing.
2. My dehydrated milk flake bead still looks phenomenal. I see no discoloration there either.
Pictures of the Milk-Plastic encased in resin & Dehydrated Milk Flakes in resin nearly a year after creation:


Experiments:
*** Final Test Results with pictures posted at the end of the post!***
Let’s create!
Breastmilk beads and pendants are amazing and sentimental pieces of jewelry to have. I never would have thought of myself as someone who would be into that kind of thing. A breastmilk bead? A necklace with my boob juice? Yep! I struggled immensely with breastfeeding Daphne, my first child, and have been so thankful that breastfeeding Penny, my second child, has been a success so far. I’m so proud of Penny and myself.
Breastmilk jewelry can be absolutely stunning. There are many men and women who offer their services and diy kits. I am one to try it myself before having someone else create for me.
So. Off to creating.
How I prepped my milk: I used a few different methods, but overall, my milk was either frozen & dehydrated or freshly pumped.
For Fresh: I pumped and created right away while the milk was still warm. You could probably thaw frozen milk and not dehydrate it if you wanted to try another method.
For Frozen: My milk was frozen for 2 months. I boiled it for a few minutes and poured it into my Nesco Dehydrator on the fruit leather/liquid insert. I dehydrated it at around 135-150F for 12 hours, then broke it up (some pieces were sticky) and stirred it up. I dehydrated again for another 12 hours(overnight) at 135-150. It was flaky and came up from the tray with ease. BIG Thanks to Victoria at Breastfeedingvic.com for the videos and invaluable input!
I pulsed the flakes of dehydrated milk and used a blunt end of a whisk as a mock mortar & pestle. I really think I needed a nutribullet or some sort of ultra fine blender here to make an actual powder as opposed to just a fine flake.

This is the breastmilk after it has been dehydrated for 24 hours, pulsed in a food processor, and ground slightly with a mortar & pestle. It really should have been a fine powder, but I didn’t have the resources.
The test batches!

My first test batch (the two silicone molds and the bottlecap on the left hand side) was to mix the dehydrated powdered milk straight into resin. I used Ice Resin (a 2 part mix of equal parts of hardener and resin). I stirred and stirred and stirred but the milk didn’t seem to mix with the resin at all. I tried pouring resin into the silicone mold first, a little bit of dehydrated flakes mixed with resin to make a paste, and then a layer of more resin. The milk stayed in flakes,separated from the layers I had poured, and sank to the bottom of the silicone mold. Even if I had poured the clear resin, let it dry, and then pour my milk over the top of it using this method, the flakes still would have separated to give that cloudy flaky look.

The second test turned out a little better. I mixed the dehydrated frozen milk with apple cider vinegar, strained it through a tea towel (very little was caught in the towel, for the most part it was liquid), and added it to the clear resin. To be fair, I could have done a better job of stirring it up and incorporating the two. The darker color in the bottle cap is the resin that didn’t mix. Also, as you can see in the bottlecap to the left, there is a filmy bubble foam and the liquid has separated.This was from the 1st test batch of straight flakes into resin. This was after an hour of pouring it.

My third test batch (the amber colored one on the left in the following picture) is dehydrated frozen milk with a lot of apple cider vinegar, I’m talking more vinegar than milk. The amber color is due to the apple cider vinegar, I think. I didn’t have white vinegar on hand to use. I bet the white vinegar would have been better. There’s no resin in this one and it is straight liquid, as opposed to the thicker formulas I had tested previously. This will take a long time to dry—if it even does. I’m not even sure that it will.
My fourth test batch (the light cream colored one on the right) is fresh milk with a little vinegar. I did not boil it (probably should have). I used 1/4 cup of fresh milk and 3/4 teaspoon of apple cider vinegar.

Third and fourth test batch.
Thoughts:
Basically, what I’m trying to do is preserve the milk by method of dehydration, via resin, or by plasticizing the milk (vinegar added to milk).
There are many science experiments where you can separate the milk into liquid and casein to make milk-plastic. Whether I added just a little vinegar or a lot to my fresh breastmilk, the clumps didn’t really form like it did in this video for cows milk.
I wonder if very little vinegar mixed with my dehydrated milk flakes would prove a better method? I think this is closer to the result I want to yield. A hard plastic-like substance that can be preserved in resin form. I want to avoid discoloration/molding/separation.
So, off to more experimenting and creating! I hope to find a method that works!
*****************UPDATE 24 HOURS LATER WITH MORE TESTS!!!! ****************
I’ve been playing with some more recipes and am getting closer to figuring it out. The test batches I have listed above, as expected, aren’t turning out good. Gotta keep trying though! It’s so interesting to see what happened with each one.
First test batch results 24 hours later:


All of these are dehydrated breastmilk flakes mixed with resin. They sank and did not mix well with the resin.
The next batch here is another test run. We’ll call it Test Batch 5. This was to add straight up breastmilk to resin. It separated like oil and water. Here’s the shot I got right after pouring…..

And here it is after drying. The resin hardened like a charm but the breastmilk, obviously, didn’t set up with it at ALL. That’s why the heart is misshapen and broken looking—that’s where the breastmilk was. After I popped it out of the mold, the breastmilk spilled and I was left with this:


So that was a flop, which I knew it would be. I had to try it out anyway!
Now. Here’s some results after 24 hours of curing and setting of my other test batches:

The one on the far left, Test Batch 1, still has that foamy weird look to it. It set up hard, but it isn’t appealing to look at. This one was dehydrated frozen breastmilk added to resin and poured.
Test batch 2 (dehydrated frozen milk with apple cider vinegar, strained it through a tea towel (very little was caught in the towel, for the most part it was liquid), and added it to the clear resin) is still curing. It’s the 2nd bottlecap from the left.
Test batch 3 (dehydrated frozen milk with a lot of apple cider vinegar, I’m talking more vinegar than milk) is the dark amber color in the silver pendant. It’s soft. Definitely a transformation from the original pour.
Test batch 4 (3/4tsp vinegar to 1/4cup fresh liquid milk) is nearly dried up.
So that’s fun. None of them came out how I thought they would, and it’s been a good learning experience!
I’ve tried another few test batches… Test batch 6 & 7. They are using the same idea but a little different execution.
Test batch 6: I researched creating plastic materials at home. What I found was this:
So, I asked myself why I couldn’t just substitute milk for water. I’m definitely not a scientist and was excited to see how milk would do in substitution for water.
Here is my initial pour with *just* 4 tbsp fresh breast milk, 1 tbsp cornstarch, 1 tsp apple cider vinegar, and 1 tsp bubble solution (yea yea, I didn’t have glycerin on hand!!) I mixed the ingredients in a saucepan, stirred stirred stirred, and after about 4-6 minutes, it became thick VERY suddenly to an almost wet paste look. I poured it into my molds and smoothed it out as best as I could. You can see in the pictures how it held up. The ones where I poured resin over the top are sealed and didn’t seem to crack very much. The resin and Bio-Milk-Plastic mix looks very interesting in the bead. It’s a little chunky for my taste, as you’ll see. I would prefer it to be smoother, which I tried to accomplish in test batch 7.


This shot was taken 24 hours later. The same thing happened to a few more that weren’t sealed in resin. Definitely some shrinking going on.
Test batch 7: I made it exactly the same way as test 6 except I did not let it cook as long. I didn’t cook it as long in hopes that the liquid state of it would be easier to pour and better incorporate with the resin.

(24 Hrs later, it wasn’t fully set up)

(24 Hrs later, it still wasn’t set up. If I had given it more time in the molds, it probably would have set up)


L to R: Bio-Milk-Plastic with resin poured all over and on top of it, Resin poured around the BMP with the BMP Exposed in the middle, and fully exposed liquid BMP inside a wet resin coated bottlecap.


How did I do it? Here’s a peek.

My setup with mixed resin and my silicone molds.

Original Milk color for reference.


This was taken between pours on test batch 7. You can see it is a thick thick liquid. We’ll see if it solidifies any after curing for a while.
*************************FINAL RESULTS!!!!***************************
My first few test batches didn’t turn out. Maybe with some more tweaking they would.
The ones with the most promise were the ones where I made my own bio-plastic with the milk, batches 6 & 7.
I created a final batch (Batch 8) and I’m very happy with the results.
Here are the updated final pictures.
 These are from Test Batch 7. Far left: Untreated biomilk only. Middle Two: Half resin/half biomilk. Far Right: Biomilk with resin on top, bottlecap not coated in resin. I think coating the bottlecap/container with resin would have sealed it all in and protected the biomilk.

These were from test 6. I added resin to completely coat the biomilk. Even now, a week later, the coating is holding up beautifully. The color is true to the original.

This is the difference between NOT fully coating the biomilk in resin (Left) and fully coating the biomilk in resin (Right).
 There are a few imperfections, but otherwise it’s smooth!
 Results from Test 6 and Test 8. The Bead on the left is from test 6, biomilk mixed with resin and then poured into a silicone mold. I then added clear resin and mixed to give the mottled effect. The color of the milk changed from cream to white once I added the resin. The Heart shaped pendant and the bead on the right are both from my new test, Test 8. Before I did anything with my milk, I coated my molds in clear resin and let it sit for about 15 minutes. I wanted a nice little coat of resin around the mold to protect the milk. Then, I cooked the biomilk as long as I possibly could, making sure it was at a final consistency of a thick gel. At this point, the gel is unable to hold a nice perfect ball form, so I couldn’t create balls like I wanted.I then molded pieces as best I could into ball – like shapes and added them to my prepared silicone molds.

Original milk color for reference.
 Test 8 results. This biomilk retained the color of the original milk.
 From Test 8.

 Color Comparison of the biomilk mixed with resin before adding to the mold (L) and just the biomilk added to the mold (R). Adding clear resin to the biomilk turned the milk a whiter color, altering it from the original color.
Overall, Coating the final molds with resin and using biomilk yields the best results!! I look forward to seeing how this holds up over time. I think the only thing I would change would be to make the biomilk more liquid so that it could be poured evenly and create smoother looks in the final product.

Leave a reply to laece Cancel reply